Showing posts with label Food. Show all posts

Thursday, December 1, 2011

Apple Butter

In this day and age with its modern store-bought conveniences, there are a few sacred items whose homemade taste can never be mass-produced.  My Granny Ruby's Apple Butter is one of them.  I am a firm believer that one's pantry or refrigerator should, at all times, be in possession of something that didn't come from the grocery store shelf.  A few weeks ago, in the thick of apple harvest, my favorite orchard was offering up apple seconds for $20 a bushel.  Score.  Now, if you don't know exactly how many apples that translates into, here they are in all their hand cramping, blister producing glory.  That's right, folks.  Apple peeling is not for wimps.


That is some serious potential sitting there, so I asked myself (as we all should from time to time), "What would Granny do?"  This question produces some practical and often sound results.  Go ahead.  Give it a try.  Apple butter was today's answer, so I picked up the phone and gave the marvelous woman a call.  

This is an old recipe, so there were a few techniques lost in translation.  For example, 6 QT of ground apples are required, but how exactly does one get ground apples?  In a hand-crank sausage grinder, of course.  "Do you have one?" she asked.  Uh, no.  "Well," she says, "I'll bet you can pick one up real cheap somewhere."  Right.  I'll put that on my Target list.  In the meantime, my shiny Cuisinart food processor did the job just fine.  I also deviated from the recipe when instructed to "place in roaster and put in oven."  Because of the quantity of apples I was using, I roasted some and simmered some on the stovetop.  The results were identical.  Do what suits you best.

Granny Ruby's Apple Butter
6 QT Ground Apples
1 cup Apple Cider Vinegar
2 TBSP Cinnamon
1 TBSP Cloves
A pinch of Salt
10 cups (or a 5lb bag) of Sugar

Peel, core, and chop apples.  Grind, if hand-crank sausage grinders are your thing, or process in a food processor until, well, ground.


Place in a roasting pan and put in oven.  Cook for 2-3 hours at 350 degrees or until your apple butter reaches your desired thickness.  Alternately, simmer on stovetop for a comparable time.  In both scenarios, you'll  need to stir periodically to keep it from sticking.  Makes 5 QTs.


Finally, put in hot sterile jars, and process in a waterbath for 10-15 minutes.


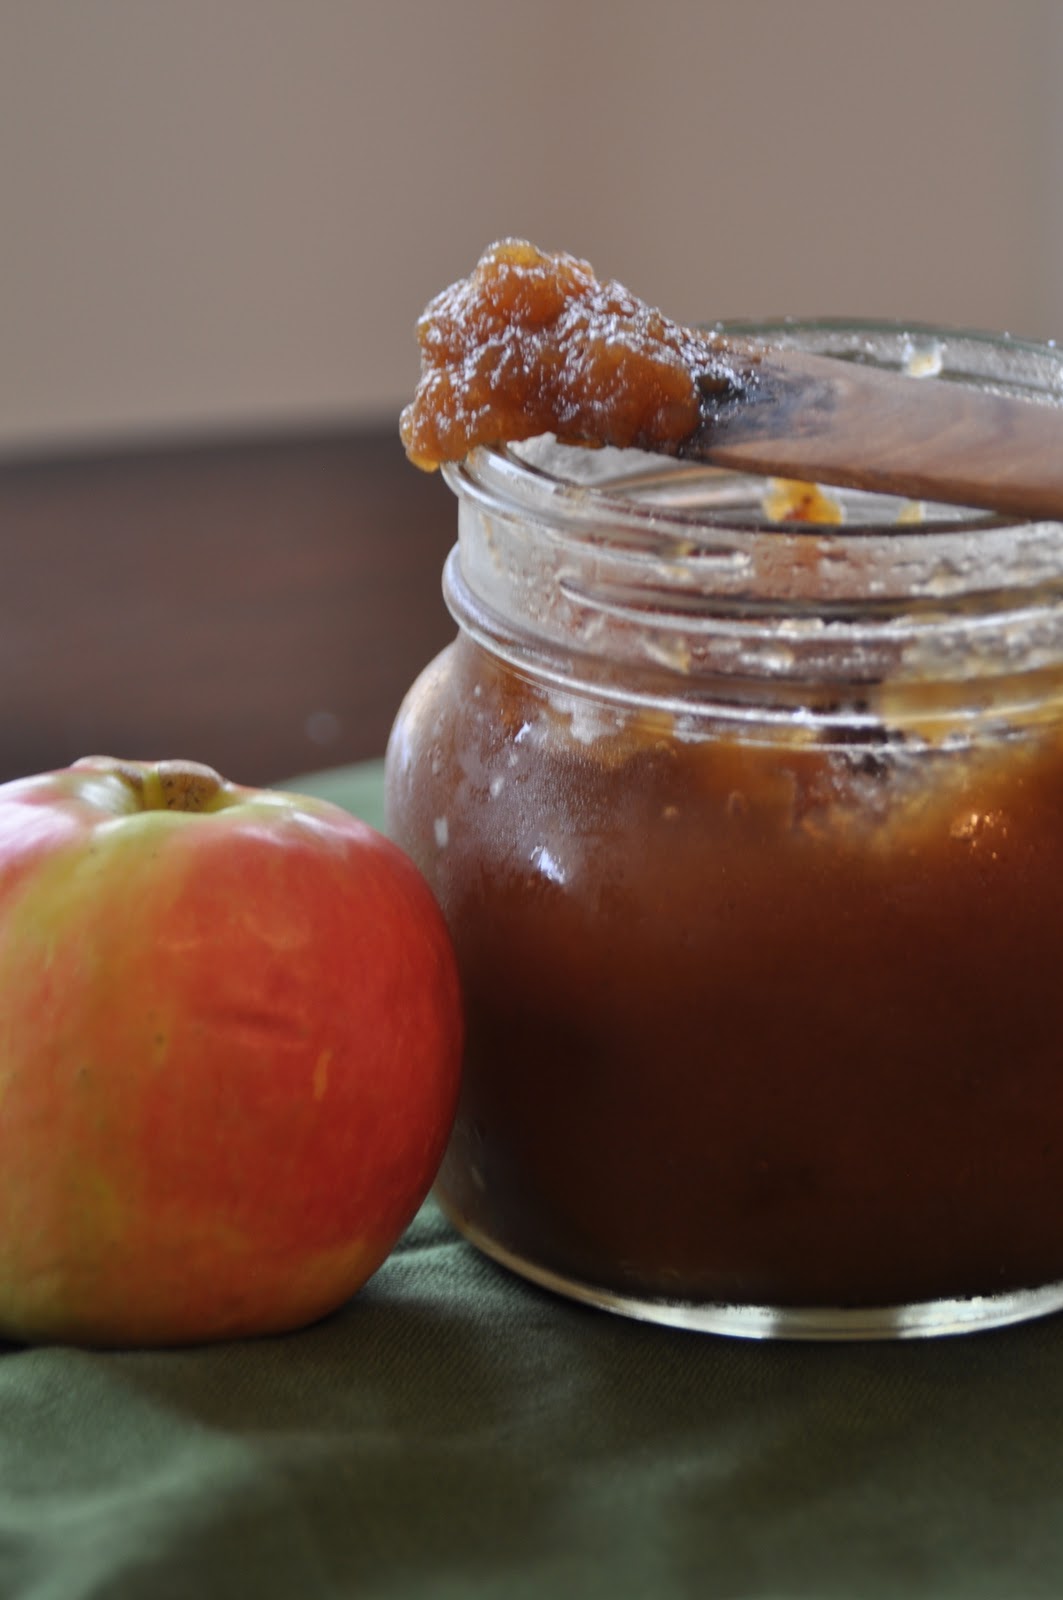
Make some.  Eat some.  Thank a granny.  They have all the best recipes.

Monday, November 28, 2011

Turkey Recycling

In an effort to show a little more appreciation this year for the delicious 13lb turkey we devoured on Thanksgiving, I decided to pick it over for leftovers as best I could,  then cook that sacrificial bird again.  And then again.  My kitchen smelled like Thanksgiving Part Deux on Friday, and now I have four quarts of homemade broth and a big pot of noodle soup for virtually zero work.  I'm feeling rather proud of my thrifty efforts and hope that somehow, in the end, I made the chopping block worth it for that tasty bird.

This works equally well on chicken, too, and multiplies the taste of that broth by at least a million.  I am sure that is a verifiable statistic.

Here's how easy it is to make homemade broth:

1.  Dump the carcass into a stew pot.
2.  Cover with water.
3.  Add two bay leaves, a handful of parsley (either or both is fine), a stalk or two of celery, a few slices onion, and maybe a piece of a carrot into the pot.  No real chopping required.  Add a little salt, too.
4.  Cover and boil for 30 minutes or until you remember you have a pot simmering on the stove.
5.  Strain.  

Repeat, if desired.  I did mine twice, and the 2nd batch was just as successful as the first.  Now it is ready to pour into ziplocks and freeze for the future, or it is the perfect base for a soup.  Adding some noodles, chopped celery, carrots and onions makes quick work of homemade noodle soup, and the rich broth means that very little seasoning is needed.


Gobble, gobble indeed.

Friday, October 28, 2011

Pumpkin Spice Syrup

You know those days, right?  The days it pours a cold, soaking rain, and everyone has to be somewhere different by an unreasonably early time with healthy lunches, warm jackets, and matching socks?  I don't typically mind, but that's because I usually make myself a warm cup of cappuccino to go, and situate myself behind the wheel of the car and sip the chaos away.  Not so this morning.  We were just too many fractions of seconds too late for such luxuries.  And by luxuries, I mean, of course, things that pertain to any sort of nourishment for yourself beyond a few fork-fulls of last night's leftovers because they were the closest thing within reach when you opened the refrigerator for those juice boxes.  Sigh.  So, here's my consolation: fuzzy socks inside my rainboots, and happy thoughts of a homemade pumpkin spice latte on the flip side.

Don't get me wrong.  I love my children and the chaos their self-centered lives bring to mine.  I don't tote them everywhere or to everything because I'd miss them, but they do attend school, and that fact, coupled with today's fabulous weather, require a cup of comfort.

There she is.  The flip side.

A talented friend of mine is a serious baker with a knack for all things yummy.  She recently posted an entry at www.themixingbowldiary.com for a Pumpkin Spice Syrup that I knew I had to try.  She gives credit to Baker Girl for the recipe, but regardless of where it came from, it's delicious and the most delectable ingredient in the above latte.  It is, in fact, much better (and better for you) than what you'll find at any Starbucks.

Pumpkin Spice Syrup
1/3 cup pumpkin puree
1 cup sugar
1/2 tsp vanilla
1 and 1/4 cup water
1 tsp ground cinnamon
1/2 tsp ground nutmeg
1/4 tsp ground cloves
1/4 tsp ground ginger

Combine all ingredients in a saucepan and bring to a boil.  
Reduce heat and simmer about 10 minutes, stirring occasionally, until the syrup thickens just slightly.  Remove from heat and pour into a heat-proof container.  It will continue to thicken as it cools.  
Keep it refrigerated.
At this point, and any hereafter, it is perfect for adding to coffee, lattes, steamed milk, or used in any number of infinitely creative ways.

So, there you have it.  I'll share the secret to today's cup of comfort.

As for the fuzzy socks, get your own.

Thursday, October 27, 2011

Sweet Success

Last night's food swap was a seriously good time.  I was in homemade heaven.  My little breakfast table was brimming with kitchen creativity and homegrown deliciousness.  Well done, ladies.  Well done.  To convince you that next month's exchange is a must for your social calendar, here is a little taste of what was brought.

These were my contributions.  The Spiced Pumpkin Syrup is an easy, must make for all you latte lovers out there who are going broke at Starbucks this fall.  Stay tuned for a simple "how-to" coming to a blog near you.  As for the Homemade Limoncello, this Italian treat is a staple in our freezer, and is a perfect ending to a hearty meal or on a warm summer evening.


After some friendly and delightful conversation, we got down to the nitty gritty business of duking it out over our most wanted items.  These were the delicious options.  They included things like homemade goat cheese, brandied cherries and glazed almonds.


And these are the rounds I won:


My boys insisted on almonds for breakfast; a good choice I might add.  We'll be eating something Ethiopian for dinner with that fragrant Berbere Spice Mix, and those Brandied Cherries, well do I share?  I think not.

We hope you'll join us next month.  Get out your calendars and set aside Wednesday, November 16th, from 6-8pm for a night of homemade fun.

Monday, October 24, 2011

Kale Chips

Here's how to get your kids to eat kale.  That is, if you're generous enough to leave them any.  Kale is all kinds of good for you, and now, all kinds of good tasting, too.  These chips are every bit as delicious as that bag of Lays, and now you don't have to feel guilty when you can't eat just one.

You'll need one bunch of kale, washed and dried.  Remove the stems, and spines, too, if the leaves are big, and give them a rough chopping.  Lay them out on on a cookie sheet or jelly roll pan, then drizzle with (about 2-3 TBSP) olive oil, and give them a good sprinkling of salt.  Toss slightly to coat.


Bake the leaves in the oven at 350 degrees for 10-15 minutes or until they look crisp and the edges are beginning to brown.  Take them out, and devour immediately.  Then, lick your fingers and wish you had made more.  Contemplate making more.  Go ahead, make more.

Saturday, October 8, 2011

When Life Gives You Basil

I'll just go ahead and rub it in.  Fall in Alabama is both long and delightful.  Warm days, slightly cool nights.  The humidity in the air has vanished.  My fall garden and I are in temperate heaven.  Aside from the impending doom of winter, the only downside I can possibly find in all this weather perfection is that my basil is threatening to bolt.  Stalks are no longer sprouting new growth, and dare I say, leaves are no longer their vibrant selves.  This is a tragic loss for my family, but I refuse to let go without a fight.  There is but one thing to do as summer disappears:  preserve.

Pesto is easy to make and freezes up nicely.  Now, come January, I get to have my basil and eat it, too.  Today, I took my kitchen shears out and gave the overgrown plant a rather aggressive haircut.

Making a batch of pesto takes no chopping, just a quick whirl in the food processor.  Here is an easy to follow recipe:
4 cups Fresh Basil Leaves
1 cup Pine Nuts or Walnuts
1 cup Parmesan Reggiano Cheese (none of that fake stuff)
2/3 cup Olive Oil
2 Cloves Garlic
Salt and Pepper (to taste)


Dump all ingredients into the food processor and mix until combined.  Add more oil if you need to for consistency purposes, and salt and pepper to your liking.  It's not an exact science, so adjust proportions as you see fit.

I've found that snack size ziplock baggies hold just the right amount of pesto for a family sized portion of pasta.  Lay them flat, press out any air, seal, and freeze for up to three months. Enjoy!

Thursday, September 29, 2011

Food Swap

I am not really the Bunco type.  Or the tupperware party type.  I am, however, the get-together type, and most definitely, the eating type.  So, here's an idea I came across.  If you think you might be a similar type, join us!


A Food Swap is a once a month get-together where all things homemade and homegrown can be shared and traded.  The idea is to bring items made from scratch with local ingredients (to the extent that is possible) and exchange them 1-for-1 with someone else's homemade creation.  Want to take home two items?  Bring two.  Three?  Bring three.  Four?  Now you're just showing off.


I borrowed this list from an existing Food Swap to offer up a little inspiration:


"Muffins, sourdough starters, vinegar mother, infused alcohol, infused vinegar, DIY extracts, canned veg, meat & fruit, fermented items, homemade yogurt, cheese, wine, jam, pickled beets, beer, dried herbs, potted herbs, vegetable plant transplants, cookies, biscotti, backyard garden vegetable bounty, salad dressings, stocks, cookies, pies, breads, dips & spreads, meals, backyard eggs, lip balm, soaps, salves, anything that is food, drink or a homemade lotion/balmy/soapy item is welcome." 

The bottom line is that so long as the item is homemade, it is perfect for the swap.  If you're new to growing, baking, freezing or preserving, it is fine, too, to bring something you've found at a local farmer's market, orchard, or roadside stand.  Maybe you'll become inspired and surprise yourself the following month.    


Our first Food Swap is Wednesday, October 26th from 6:30pm to 8:30pm.  If you are interested, leave a comment below, and I'll be in touch with all of the necessary information.  If you think someone else would be interested, please forward the invite along to them, too.  Everyone is welcome to attend.  


If you'd like to see a Food Swap in action, you can visit this site.  Many thanks, Becky and FSC Swappers, for the inspiration!


Hope to see you there! 

Sunday, September 18, 2011

Fast Food

I am not known to exercise much culinary skill or adventure on Saturday nights.  After a long week, I get either busy or lazy and often find weekend dinners an afterthought.  This means that to make its way to my table on these nights, food must be quick, easy, and tidy.  Let me argue, however, that convenience does not have to equate frozen, boxed, or frozen and boxed.  Case in point: I made a tasty dinner last night in less time than it would have taken me to heat a frozen pizza.  The secret?  A Saturday morning Farmers Market.  Amongst other delectables, yesterday's take-home was a tub of herbed goat cheese lovingly made by a family right here in North Alabama.

Now if the mention of anything goat triggers your gag reflex, keep in mind that if the cheese is fresh, it is buttery, delicious, and non-goaty.  Really.  Because I am still sensing a collective eyebrow raise from the lot of you, I encourage you to taste for yourself.  Farmers love to give out samples, so if you can tear yourself away from the little old lady and her jars of jams and jellies at next week's market, find yourself a goat farmer with a tub of cheese.  I think you'll be surprised.

Here is last night's convenience food:


Boil a pasta of your choice according to package directions.  Drain, reserving a little of the water.  Add a tub of flavored goat cheese and enough of the pasta water to make it perfectly creamy.  Top with chopped fresh chives and enjoy!


My youngest politely declined, but the rest of us agreed.... not baaaaaad.

Oh, come on.  You saw it coming.

Wednesday, September 14, 2011

Allergic to Food

A few years ago, I picked up a book on a whim that proved to be a life changing read.  That book led to another which led to another and so on, until I woke up one morning with backyard chickens and a minivan full of horse manure.  Sometimes life sneaks up on you that way.  I am happier and healthier for it, though, and if you'll hang with me and this blog for long enough, maybe we can learn some more together.  

This video is a good start.  Yes, it takes 18 minutes to watch, and yes, that is a long time.  It is not preachy nor full of scare tactics, but rather, it condenses quite a little bit of fact and education into the amount of time it takes you to eat that morning bowl of cereal....or midnight bowl of Haagen Dazs.  

And, if you suddenly desire to wake to the sound of clucking or develop a strange new aversion to life-depleting Twinkies, please direct all complaints to my sister-in-law who sent me the video in the first place.

Friday, August 26, 2011

More than Peanut Butter

No matter how many tasty foods I try to put on the table, there is a distinct possibility that if you ask my children to name their favorite, you'll get a mutually agreed upon answer:  peanut butter.  I support their consumption because it is an excellent source of protein, is quick, easy, and versatile, and if as an adult you haven't revisited the peanut butter and jelly combo, it is delicious.  I am choosy about my peanut butter, however, and I assure you that this choosy mom doesn't choose Jif.

If you carefully read the label of most grocery store peanut butters, you'll see the following ingredients listed:

  • Peanuts
  • Sugar
  • Hydrogenated Vegetable Oils
  • Mono- and Diglycerides

Although that's a short list (and short lists are usually good), let me explain why this short list is bad.  Let's start with the oils.

Vegetable oils like soybean and rapeseed (as is found in mainstream peanut butter) are liquid at room temperature.  To prevent peanut butter from separating (gasp), scientists bombard the oil with hydrogen, alter its molecular structure and give the industry a solid oil that makes your peanut butter creamy and also increases its shelf-life.  Now your peanut butter is solid, yet spreadable, and will last into the next century, but it is no longer a whole or natural food.  These peanut butters have origins in a science lab.

Don't glaze over.  Stay with me.

The mono- and diglycerides automatically rule out the purchase of any peanut butter that contains them for one simple reason:  I have no idea what they are.  As a rule of thumb, it is wise to shop for and consume products that contain only ingredients you recognize.  If you can't pronounce it or can't identify it, don't buy it.

We all know that transfats are now taboo, and because of heightened public awareness, food companies are removing them from their products.  However, as consumers of these products, we demand that taste and texture not be altered, so a substitute must be found.  Enter mono- and diglycerides.  They are glycerol molecules with one or two fatty acid chains chemically removed, in a lab, and are emulsifiers widely used in bakery products, margarine and yes, peanut butter.  They are next-of-kin to transfats and used in much the same way, so does that make them bad too?  Science doesn't yet know.

My answer to the peanut butter quandary is to buy products that contain only what they should:  peanuts and salt.  It just takes an extra second or two to read the label.  You may have to stir it, but if that is as scientific as the process gets, you can feel good about what you are eating and the bigger bicep you'll get as a result.

Just for the sake of curiosity, I attempted to make my own.  It wasn't hard, but if I'm honest (despite my love for things homemade) it wasn't necessarily cheaper, and it made my food processor a booger to clean.

I discovered that I didn't really need but just a few drops of the peanut oil, and missing from the picture is the honey that Cal and I added to make it extra delicious.


My peanut butter was a little lighter in color than most because I used raw peanuts rather than roasted.  Apparently, it also paled in comparison to what we normally stock, because Cal told me just this morning that "he didn't want that white kind on his sandwich."  Ouch.

Go forth and buy good peanut butter.

Wednesday, August 17, 2011

Pepper Belly

I love spicy food and planted myself a jalapeno plant with the expectation that I'd have a few peppers throughout the summer to keep me in the heat.  I had no idea, however, how prolific that one plant would be, and I am finally having to cry uncle.  My family bailed on me weeks ago.  Sallies.  I couldn't stand for all those extra peppers to shrivel in my produce drawer, so I pickled them.  In just four days, I collected enough peppers to do this.


A little vinegar and water, a little salt, and a tiny pinch of sugar will give us summer grown fire in a jar all year.  Bring it, plant.  

Saturday, August 6, 2011

Salsa

I love homemade salsa and thought this last weekend that I'd whip up a batch for canning.  Summer is giving off an abundance of tomatoes, peppers, and cilantro, so I gathered up the ingredients and dedicated a few precious Saturday hours to some intensive chopping and stirring.  However, I was NOT rewarded for my efforts.  Now I feel a little disgruntled that my plan failed for two obvious reasons that I should have seen coming.

First of all, you can't can fresh salsa.  Everything that is to be preserved must first be cooked.  Cooked salsa is not as good as fresh salsa.  Secondly, the recipe I found included sugar.  In fact, almost all of them did.  I'm not sure why, but I assumed that the addition of sugar would be ok.  Afterall, I'd never cooked salsa before.  Let me now be clear.  Salsa should never include sugar.  Garlic, yes.  Salt and lime juice, most definitely.  Sugar, no.

I speak generally, of course, but often wonder why is it that our culture thinks everything should include sugar (or more often high-fructose corn syrup).  My personal theory is that our taste buds have been trained to tolerate and even crave it since most industrially produced food does include it.  It is cheap, it is abundant, and because the government so heavily subsidizes the production of corn, we have to do something with it.  I've found that stepping out of the supermarket and into the garden gives you an appreciation for real flavor and an intolerance for things doctored with manufactured ingredients.  Michael Pollan, a favorite author, delves a little deeper into the subject in his article here.

So, now I have 8 pints of sweet salsa that I am contemplating dumping, which gives new and literal meaning to "all that hard work down the drain."  However, I think filling those jars with plain ol' canned tomatoes would be a better option this winter when the mood for fresh salsa strikes.
Bummer.

The silver lining in the salsa fiasco is my discovery that it is easy to peel and can a tomato.  While it would be virtually impossible to remove the skin from a fresh tomato, giving it a 30 second bath in boiling water makes quick work of removing the peel.  Simply score the bottom of the tomato with an "x" (careful not to cut too deep), dunk it in boiling water for half a minute, remove, and run some cold water over it (to stop the cooking process).  The peel will quite literally slide right off.  Chop, boil, and can.  No sugar required.
Before Hot Water Bath

After Hot Water Bath

Saturday, July 23, 2011

The Importance of Organic

A friend sent me a link to this video, and I love it.  I had to repost.  It is a simple argument for the purity and quality of organic produce that came from a student's science experiment gone wrong.  If you have a couple of minutes (2:32, to be exact), it is worth the time.  The end result speaks for itself!

Tuesday, July 19, 2011

While the Cat's Away

My husband's hobby is collecting work related frequent flier miles, so to make the best of it, the mice and I do our best to play while he's away.  Last night's adventure was an early bath and pajamas and a favorite movie with popcorn.  As I pulled out the pot and the colorful kernels, I wondered how public was the information on those deceivingly simple and convenient bags of the microwavable stuff?  They contain carcinogenic ingredients, or at least "likely carcinogens" according to a report by the FDA.  Did you know?  I had no idea until last winter, so I thought I'd share.


The chemical coating used inside of microwavable popcorn bags breaks down when heated into a substance called perflourooctanoic, or PFOA for short.  This substance is, according to the EPA, a "likely carcinogen" and in studies has been proven to cause cancer in laboratory animals.  In these studies, it is stated that it is also likely to cause cancer in humans.


Additionally, that yummy butter flavoring we love contains diacetyl and is harmful when inhaled.  In fact, in the snack industry, there is a known condition called "Popcorn Worker's Lung" (officially bronchiolitis obliterans) suffered by those in factories that produce microwave popcorn due to the extended exposure of workers to diacetyl.


The FDA is conducting additional studies on the impact of these two chemicals in small doses and so, in the meantime, microwave popcorn remains plentiful on grocery store shelves.  Because PFOA has gotten recent publicity, manufacturers are beginning to discontinue its use.  However, I couldn't continue to justify the perceived convenience when the harmful evidence is so convincing.  I've discovered that, in reality, real popcorn is no more difficult to make.  Besides, the kids love the thrill of watching the little explosions of kernels, and it tastes far superior anyway.


You'll need the following:

  • Large, deep pot.  I use my stock pot.
  • Oil (I used plain ol' vegetable oil last night since I was out of grapeseed oil.  Both are flavor neutral.)
  • Popcorn Kernels (I buy them in bulk)
  • Salt


Heat a good "glub glub glub" of oil (enough to cover the bottom of the pot) over a hot stove.  When the oil is hot, pour in your kernels.  Popcorn is big and fluffy, so a few kernels go a long way.  Go ahead and cover 1/2 to 3/4 of the bottom of the pan with kernels.  That should do it.  Put the lid on.  Give the pan a little shake every 20 seconds or so.  Within a minute or two, they should start to pop.  Continue to shake a little every now and then.  Another minute or so later, the popping will slow.  Pour into a big bowl, salt, and dig in!  Now you can enjoy your popcorn without a side of cancer.

Sunday, July 17, 2011

Impulse Buy

Yesterday I spotted these beauties at a roadside stand and couldn't resist the urge to stop and buy them from some really swell people.  Since they looked and smelled so good, I figured that two baskets of peaches would be better than one.  Really, three would have been better than two, but I'll go back tomorrow.  There is only a small window of time that a person can get sun-ripened, straight from the orchard, fresh-picked peaches, and this is it.
It is a goal of mine to do more food buying locally and from the growers who actually knew their product from it's seed or bud infancy.  There are fancy names for such people.  Foodie.  Locavore.  I don't need a title, just a good couple of farmers.  Roadside stands, farmer's markets, and CSAs bring your food courtesy of their pick-up and right off the farm.  The food was picked at it's peak when it had time to mature into its full nutrient potential.  The same cannot be said about those mangos from Guatemala or the melons from Mexico.  They are picked while green and ripen on the long journey from their place of origin.  


In addition to better foods, you also get to invest your hard earned dollars back into the local economy, keep your environmental impact down, and you'll have the chance to get to know and support some seriously nice people.


The boys and I did our first berry picking last week.  It was swealteringly hot that day, but the time with friends and the bucket of fresh blueberries were so worth it.  


If you think you might be up for an alternative (or addition) to your weekly Kroger run, check out these sites for some fun food alternatives:
www.pickyourown.org
www.localharvest.org


Peach Butter was the end result of yesterday's impulse buy.  Definitely not a purchase I'll regret.  


Let's share.  What are some things you and your family do keep it local?

Friday, July 8, 2011

While the Gardener's Away...

This is what happens when this gardener takes a long weekend for herself.  Three days.  That's it.  I came home to find squash and zucchini doing its best to reach the far corners of its boxed-in world (a project it has worked on all summer) and growing fruits big enough to singularly feed a small army.  The eggplant is dripping with purple preemies.

 I had numerous cucumbers and tomatoes, too, but those were promptly devoured.  They seem to be underestimating my appetite for their homegrown goodness.  Must plant more of them next year.  


The thing I will plant less of is, of course, summer squash and zucchini.  I planted two of each and both are so productive that my produce drawer groans and often threatens not to close.  Apparently, I am only so creative in my cooking, so now I am scouring the internet for tasty and alternative things to do with my surplus.  

There is chopping and freezing for a time when I can more appreciate the abundance, like, say, winter.  Soup recipes seem to be easy to find.  Can you freeze breads?


Help a girl out.  What do you do with all that green and yellow bounty?

Tuesday, June 28, 2011

My First Six Pints

I remember complaining years ago about having to eat home-canned food, all strange and sloshy and combined into weird things called "chow chow" and such.  I can hear myself now.  "Can't we just get the REAL thing at the store?"   Did you ever feel the same way?  "Homemade Mac and Cheese???  But I want the blue box!"  Oh, marketing.  How you fooled me then.  I stopped eating canned foods a while back, because they are just so nutritionally lacking, often full of things I don't recognize, and well, just so processed tasting.  I'll admit to succumbing to the convenience of canned tomato products and black beans, but small confessions aside, that lifestyle change left some slim pickins come winter time.  Now that I am gardening and drooling over sun-ripened peaches and the like at our local farmers' market, I have decided that my grandma was onto something.   I make chutneys.  I make salsa.  Why not can them while I have all these tasty ingredients right at my dirt-covered fingertips?  


The thought of canning seemed intimidating (what with dials and knobs and boiling water and botulism), so I took a basics class at a local farm.  Turns out, both the class and the chore were easy and delightful.  So now that I feel no fear of large steel pressurized pots, I've decided I can can.  I will can. 


I'm currently in Oklahoma with my parents drooling over my dad's exceptionally beautiful and abundant garden.  I swear his plants come out of the ground throwing squash, zucchini, peppers and corn at him.  We are in the (literal and figurative) heat of cucumber season and his bucket runneth over.  I've desperately tried to eat them all.  I've even contemplated slicing them over my morning bowl of Kashi.  But it appears that the only way to prevent waste (the horror) is to put them in a can.  Since I'm new to the sport, I picked a simple, 5-ingredient waterbath recipe called "Best-Ever Dill Pickles."  Prep time:  30 minutes.  Processing time:  10 minutes.  It goes like this:


In the beginning, there were jars.

In the middle, there was a lot of slicing.

In the end, there were pickles.  


Then, I cheated.  The directions say to wait one week before opening, but that must be only for those who have made their own pickles before or who possess more will-power than this first-timer.  The result?  Delicious.  Simple.  Plentiful.  Will need garlic.  (But then, really, doesn't everything?)  

This summer, I have dreams of a pantry full of jars filled with all things strange and sloshy.  And no blue boxes.  My kids can thank me later.


Friday, June 17, 2011

A Summertime Staple

My absolute favorite thing to do with the summer bounty coming from my garden is to chop up whatever I pick that day, fire up the grill, and give the mix a good roasting over the open flame.  If you don't yet own a grill basket, you need one.  I use it year round for a quick and easy way to roast spring, summer, and even fall vegetables, and to make people think I'm a much better cook than I really am.  Just throw some things in there, stir them a time or two, and when done, combine them with something.  Anything.  Add a sprig of basil to the top, and it will taste as fresh and colorful as it looks.


Here's the basics...

Chop Zucchini, Summer Squash, Red Onion, Bell Pepper, Asparagas...really, WHATEVER you have on hand.
Toss in some Cherry Tomatoes, too, if you like warm, squishy tomatoes.  I don't, but I hear people do.  Bleh.
Drizzle with Olive Oil and Sprinkle with a good measure of Salt and Pepper.

Toss into your grill basket and cook for about 10 minutes, give or take, until veggies have softened and are starting to brown around the edges just slightly.  In the meantime, cook orzo, whole wheat penne, couscous, or quinoa according to package directions and per your desired serving.  Drain and combine with veggies.  Chop and add fresh basil (an herb garden MUST!).  Grilled chicken breast or chicken sausages are tasty in the mix, too.

Add a splash of fresh-squeezed lemon juice or good quality balsamic vinegar.  We top with a little sprinkling of feta, and there you have it.  20 minutes or less.  If you count leftovers, then technically you just made tomorrow's lunch, too.
  
Related Posts Plugin for WordPress, Blogger...