Showing posts with label Gardening. Show all posts

Monday, April 9, 2012

Bones

Let's just admit it.  All families are unique.  Different.  Individual.  

I'll go ahead and call a spade a spade.  Mine is just plain weird.  Or so I assume the neighbors must think.  We raise chickens in the burbs.  Our shrubbery consists of things like blueberries.  My eldest makes costumes from bones.

That's right.  I came home from errand running to find him striking warrior poses in the driveway and wearing assorted bovine skeletal remains.  Then, I came out to take pictures.  It seemed like a photographic opportunity if there ever was one.  I kid you not, traffic slowed.

Oh, well.  Who wants to be normal when you can be a ninja warrior?

The headdress, creatively fashioned from a pelvic bone.

A rib bone dagger.  
His other weapon was a surprisingly aerodynamic boomerang, or as it is more commonly called, a jaw bone.  It did not return when thrown.

Oh, and look.  He decorated.  He seemed genuinely hurt and disappointed when I did not see its decorative value.

In an attempt to salvage what good standing we have left, I put it away.  I figure there will be plenty of other future opportunities for us to raise concern among neighbors.

Tuesday, March 20, 2012

Spring

Spring has sprung in our little backyard farm, and life is in full bloom around here.  We have some unseasonably warm and record setting temperatures to thank for our early season, and although my cauliflower doesn't seem to care much for the heat, I do.  These are the days I love.  Coffee on the patio.  Half naked children squealing in the backyard.  Bouquets of dandelions.  Pesky dandelions.  Fresh food.  Farmers markets.  Swimming.  Golden tans.  And pregnant bellies.

That's right.  A pregnant belly.  All the rage this summer.  Or haven't you heard?

My pant size is currently the most rapidly growing item in this whole homegrown venture.  It isn't as lovely or as delicate as the pictures below, so we'll not harp on it.  Or how totally nauseating dog farts smell during the first trimester.  Or how nice and cold and welcome the smooth porcelain of my toilet feels at any given hour of the day.  Or how obsessively delicious seedless watermelon and nacho cheesy Doritos have become.  Don't tell me what's in them.  I don't want to know.  I can only concede that it was a fatal attraction and moment of weakness on the chip aisle.  End of story.

Come fall, however, we'll be downright wallowing in homegrown beauty and lovesickness.  But, in the meantime, let me give you the more pleasant side of spring.

Blueberries

Peaches


Grapes

Tubs of Potatoes


Broccoli

Pears

Busy Chickens

It appears there is new growth at every turn, and it is shaping up to be a bountiful summer.  

Wednesday, November 9, 2011

Space Invaders

Apparently things like small boys and chickens draw neighborhood children to one's backyard.  Because my little ones are still ... well, little ... having stray kids wander into and out of our yard and house is uncharted territory.  These little space invaders are certainly not unwelcome, but their sudden arrival has left me mentally scrambling for a few ground rules.

First of all, it turns out that suburban chickens are rockstars with a rather loyal and attentive fan base.  The girls have reasonably tolerated their new stardom, but it was apparent that rule number one would now have to be required adult permission before entering the coop.  This new law went into effect after I overheard the following, "Hey, hand me that long stick so I can catch a chicken," and after a post prison break round-up when some little darling accidentally left a coop window open.  Spike, the bulldog, almost had himself a rather delicious chicken snack.

Also popular with people shorter than me is our growing garden.  It seems to be a real curiosity.  My always generous first born was leading the charge on Saturday happily picking and distributing our assorted vegetables, many of them still unripe.  While I most definitely love and want to encourage an interest in gardening amongst young people, I'll admit that a small part of me also wanted to beat them out of there with the afore mentioned long stick.  Instead, I put the housework aside, and offered a personal tour and sampling of those things that were ripe and ready.  It was so rewarding to hear one girl take her bag of goodies and say, "I'm going to make dinner for my family tonight!"  That comment alone atoned for any previous sins committed against the garden.  However, rule number two is now required adult permission before picking produce.

As the day wore on, I observed kids giving each other hay rides in the little red wagon, hunting for red strawberries, and feeding the chickens some greens that were a little past their prime.  I loved my messy backyard farm all over again.  

Rule number three?  Any kid is welcome at any time.

Friday, October 14, 2011

First Harvest

In an effort to create some fall and winter variety in my garden, I planted these.  I just dug up my first bunch, and aren't they gorgeous?


It turns out, I have a knack for growing turnips.  They all came up in record time and are quickly filling space on my counter where they are waiting for me to figure out what to do with the lot them.  A bumper crop of turnips - just like my summer okra - begs the obvious question, "Now what?"  There are only so many turnip recipes in my repertoire.  Foresight would have greatly benefited me here.

My boys have been watching them eagerly.  You see, they've never eaten turnips before, and I made the innocent mistake of likening them to potatoes.  Not true, I was later told.  Not true at all.  Well, I think they're delicious, and it is a good thing, too, since I may very well have to eat my weight in them.

Turnip soup, anyone?  How about mashed turnips?  No?  Wait, wait.  I know.  Stewed turnip greens.  Oh, now see?  The possibilities are just endless.  My boys are thrilled.

Monday, October 10, 2011

Save the Butternuts

Two days ago, I had these great looking pumpkin vines and a variety of squash plants that were bursting with plump little fruits and bright yellow flowers.  Then I went to bed.  A morning stroll around the garden yesterday revealed an overnight sneak attack of powdery mildew.  That stuff moves fast.  By today, the leaves all look like this:


Powdery Mildew, a fungal disease, is a common ailment in the late summer, and squash plants are particularly susceptible.  The little fungi spores are spread by wind, insects, and rain (or overhead watering).  If you find the white powdery spots on any of your plants, move fast.  Immediately remove and discard infected leaves.  Do not compost them.  Spray the plant with a baking soda or sulphur mixture or with neem oil.  You'll need to stay right on top of it to prevent continued spread.  This disease will cause premature leaf fall and will weaken the overall plant.

It would be a serious shame to lose even one of these little guys, wouldn't it?  Let's hope my squirt bottle and I won that showdown.

Saturday, October 8, 2011

When Life Gives You Basil

I'll just go ahead and rub it in.  Fall in Alabama is both long and delightful.  Warm days, slightly cool nights.  The humidity in the air has vanished.  My fall garden and I are in temperate heaven.  Aside from the impending doom of winter, the only downside I can possibly find in all this weather perfection is that my basil is threatening to bolt.  Stalks are no longer sprouting new growth, and dare I say, leaves are no longer their vibrant selves.  This is a tragic loss for my family, but I refuse to let go without a fight.  There is but one thing to do as summer disappears:  preserve.

Pesto is easy to make and freezes up nicely.  Now, come January, I get to have my basil and eat it, too.  Today, I took my kitchen shears out and gave the overgrown plant a rather aggressive haircut.

Making a batch of pesto takes no chopping, just a quick whirl in the food processor.  Here is an easy to follow recipe:
4 cups Fresh Basil Leaves
1 cup Pine Nuts or Walnuts
1 cup Parmesan Reggiano Cheese (none of that fake stuff)
2/3 cup Olive Oil
2 Cloves Garlic
Salt and Pepper (to taste)


Dump all ingredients into the food processor and mix until combined.  Add more oil if you need to for consistency purposes, and salt and pepper to your liking.  It's not an exact science, so adjust proportions as you see fit.

I've found that snack size ziplock baggies hold just the right amount of pesto for a family sized portion of pasta.  Lay them flat, press out any air, seal, and freeze for up to three months. Enjoy!

Saturday, September 24, 2011

Husband vs. Shovel

Oh, Snap.

In the course of his year-long gardening career, my husband has broken four shovels in the red Alabama clay in which we are trying to grow food.

Such a strong, handsome, shovel killing man.

Tuesday, September 20, 2011

Greek Yogurt Win

Remember the magic homemade ant-killing potion I tried here?  The results are in.

For those with a small ant colony or infestation, I would have to give the organic borax method two thumbs up.  For those whose homes must surely be sitting on the largest fire ant colony east of the Mississippi, we go commercial.

The method I attempted worked splendidly on the existing colony, but following its demise, we found another.  And another.  And another.  In fact, they are surfacing all over our yard - front and back - and have even killed off various and assorted shrubbery.  We are constantly in a state of scratching some sting from the irritating little buggers, and so we are launching a full out chemical assault on the entire population.

I am beginning to feel at war with mother nature one pest at a time.

Saturday, September 17, 2011

Rookie Mistake

Our trash can potatoes were looking rather wilted, so we decided the time must surely be right to dump our tubs and see what we had hiding beneath the mangle of vines.  It turns out that wilted is not dead enough to signal developed tubers.  We had potatoes, most definitely, but they were smallish and immature.  If curiosity had not gotten the better of me, and I had followed my own advice, I very well may have had a more robust crop.


I am also thinking that my choice in seed potatoes contributed to the puny harvest.  I used what I had in the pantry which came from my neighborhood grocery store.  Remember that video on organic produce I posted here?  Not fabricated.  See the results below.


I'm no quitter.  When your dreams consist of things like tubs of homegrown potatoes, you always try again.

The moral of the story?  Patience, young Jedi.  And, Jedis should not plant industrially farmed potatoes.

Sunday, September 11, 2011

Slippery Slope

There is a fine line between backyard farmer and redneck, and I think we just crossed it.

You see, we have the infuriating problem of a rather large rabbit who has gained his girth by dining on our hard work.  Our backyard has become his own personal Garden of Eatin', and I swear he has doubled in size this summer alone.  We first saw the wascally wabbit early in the spring, and being the uneducated gardeners we were, we thought he was super cute with those big ears and little cotton ball tail.  If I had known then what I know now, I would have worked harder to catch him before he became quite so educated in the ways of the world.  Now, this full-grown rabbit is sneaky, elusive and always hungry.  I have lost many a plant (his favorites being strawberries, beans, peas, and young, tender greens) to his appetite, and last week when he devoured another two rows of green beans, a row of beets and one of cauliflower, he broke this camel's proverbial back.  Four long months we have tried live traps and a multitude of scare tactics, but he will not be caught or deterred.  I'm pretty sure that yesterday when I was replanting, I heard war cries coming from the row of hedges that serves as his line of defense.

That's it, rabbit.  Game on.

Now, when battle plans were being drawn up, I envisioned a little hand-held air-pump beebee gun that we'd use to administer a painful no trespassing reminder.  Instead, my husband returned home bearing a pellet gun that I'm pretty sure he chose for the sole reason that it had a picture of a rabbit on the side, under which the words "large pest control" and "small game hunting " were written.   It is not discreet nor suburban by any stretch.  Did I mention it has a scope?

Now, thus far our neighbors have surprisingly tolerated our growing backyard farm as well as our budding chicken operation.  We're a little novel and grassroots, and so far tolerable.  However, I am slightly afraid that backyard rabbit hunting may very well get us voted off the island, and slightly disturbed that we feel rabbit dumplings would very well be worth it.

Saturday, August 27, 2011

Operation Window Boxes

When we bought this house last fall, we had to look past some ornamental metal what-nots hung on the exterior and window boxes stuffed with plastic flowers.  Yikes.  All outdoor decor has long since been removed by my two hardworking (and always tasteful) parents, but tragically, those window boxes refused to budge.  And so they've sat; empty and blending into the wall on which they cling.  My husband was thinking aloud a few weeks ago and happened to mention that they could be repurposed.  Say no more.  Visions of my children tending their little window box gardens and munching on long, slender carrots and leafy greens drove me to Lowes for black plastic and bags of soil.  And so our garden grows.

Operation Window Box was really very easy.  Because ours are wooden, we lined them with black plastic trash bags (to prevent rot), filled them with good, rich soil, and planted.  That's it.

If you're considering a garden but fear the commitment or don't have the time or yard space, this approach could be for you.  You'll have to select your seeds with a little more thought to size constraints, but you, too, could reach out your bedroom window for a fresh clipping of homegrown herbs or spinach or crisp carrots.  A bona fide midnight snack.


Monday, August 22, 2011

The Gardening Blues

Sometimes I get discouraged at how slow a process it is to convert one's backyard into a discreet, edible paradise.  Gardening is hard work in the hot Alabama sun, and on occasion, I feel a little miffed that the land isn't reciprocating by giving back bushels of homegrown deliciousness.  I mean, really, where is the give and take in this relationship?  It is a moment of weakness, I know, to assume that one can go from boxwoods and crapemyrtles and chicks to kale and bell peppers and fresh eggs in one summer.  It must be my microwave mentality or my strong belief that hard work equates results.  Mentioning the above to my well-grounded husband after a labor-filled weekend got me an eye roll and a lecture about how "these things take time."  Blah blah blah.  Where are those stinkin' watermelons?

Now that I've had a shower, some mindless television, and a good night's sleep, I find myself being drawn back to that fall seed catalog and an obsession to weed my garden.  I can't help myself.  There is just such potential out there.  No education was ever free, and I'll be darned if I ever buy a squash again.

Just for the sake of perspective and personal morale, let's tally this summer's backyard farming wins:

  • 20+ ornamental plants removed
  • A 10' X 20' garden installed (with retaining wall)
  • 10 cubic yards of topsoil delivered and spread
  • Spring and summer garden planted
  • Herb and strawberry bed created
  • 6 Blueberry bushes, 3 raspberries, 3 blackberries, and 2 grapevines planted
  • The addition of three trees - peach, apple, and pear
  • Chicken coop built
  • 4 pet chickens hatched and delivered
  • A seriously envious summer tan

No one learns a new skill overnight, or in one summer.  Perfectionists and hard workers, take heart.  Plant a seed.  Sweat over it for good measure.  If a rabbit eats it or it gets hornworms, it was nothing if not an education.  You'll know better next time, and next time you'll have tomatoes.

Or, just try microwaving it.

Friday, August 19, 2011

Seed Starting

Seed starting is something gardeners do to save money, reuse heirloom seeds they've saved from the previous year, get a jump-start on the growing season, or is just a good excuse to grow more things in strange places like your laundry room and bay window.  I've decided to give it a try with some herbs I hope to plant in a few weeks.  It's supposed to be simple and easy, and since my kids can do the work themselves, it seems like a worthwhile experiment.  With fall around the corner, it is time to get those seeds started, so here's a quick how-to.

Supplies
You'll need good quality potting soil, preferably a seed-starting mix.  It is very loose and will provide ideal aeration, drainage, and water retention for those little roots and leaves.  You won't need much.  Go small.  Most big retailers and nurseries carry it.

You will also need some small, individual containers.  These come in a variety of shapes, sizes and materials, so I decided to try a mixture to see just which method I like best.
     Fiber Pots:  These are biodegradable and can be set right into the ground when you're ready to     transplant outside.  This means that there is one less step in the transplant process, and it helps to prevent transplant shock.
     Flats:  This method allows you to use small, reusable (thus sustainable) plastic containers that can hold as few as 6 or as many as 72 plants in one tray.
     Coir Pellets:  These are dehydrated round disks that contain pot and potting soil in one unit.  When you're ready to plant your seeds, you just rehydrate and go.  To transplant, cut away the netting that holds the pot together.  It sounded messy.  I did not try these.
     Yogurt Containers and Plastic Cups:  This is an economical approach and works perfectly if you remember to poke a few holes into the bottom of the cup to allow for drainage.

Plant
Go ahead and fill those containers with soil and seeds.  The seed envelope will give you planting and watering specifics, and will let you know when you can expect to see little green buds poking their heads through the dirt.


Be sure to label each pot by writing directly on the pot or using a marker to help you identify them later.  We opted for popsicle sticks.


Water and Sun
Just like seeds sown outside, your indoor seedlings will need to be kept moist and will need to see some sun.  Seed planting kits usually come with a dome that covers the flat and is used to retain humidity for the first few days.  I've read, too, that you can cover the pots with some plastic wrap and accomplish the same thing.  I may be sorry, but we did not use either technique.  I do have some sprouts already, so I think we're in the clear.  The goal is to keep the pots warm to aid in germination.  The dryer in my laundry room helps to keep the air a little warmer, and with two small boys, it runs often.

When watering, do so gently.  A little sprinkle or even a good misting is best since those seeds are not buried deeply and can be easily drowned or washed out when watered heavily.  Be sure to keep them watered frequently, however, because those small pots can dry out quickly.


After planting and before hardening off, your seedlings are not ready for intense sun.  Some indirect or filtered sunlight (like a window sill or grow light) will suffice.

Hardening Off
This is an important step in the transplant process.  You little plants have thus far lived a very sheltered life and exposing them to the elements without a little time spent adjusting is a quick way to kill off those tender green youngins'.  You'll want to start gently.  Let your plants spend a few hours a day in the shade.  After you've done this for a few days, give them a little - a very little - direct sun.  Then, give them a combination of the two, gradually increasing the amount of time the plant spends outside.  By about day 10, your plants should be well exposed to the elements and ready for transplant.

Transplant
Your plants are now ready to place in your garden or bed just as you would any other plant you bought at your local gardening store.  Make sure they go into good soil with plenty of water.

You can start seedlings indoors with flowers, vegetables and herbs.  Some seeds are labeled "direct sow" which means they do better if planted directly in the out-of-doors. This just means that they don't transplant well.  Others, however, will benefit from the head-start they get establishing a root system and a few leaves before facing the sun, wind, and rain.

Good luck!

Friday, August 12, 2011

Death By Greek Yogurt

I love greek yogurt.  It is so delicious, healthy, and multipurpose.  Its tub also happens to be the right size for my ant-killing experiment.  You see, I have this problem.
That would be a fire ant colony in my garden.  I can't fault the ants for their choice in location with its loose soil and close proximity to a buffet of veritable delights.  However, they are plentiful, ferocious, and I am tired of being stung.  Death to the colony.

A little online research guided me to a mixture of sugar and borax for a long-term kill.  According to the box, Borax is an "all natural laundry booster and multi-purpose household cleaner."  It is a 400 year old weak acid extracted from a type of salt called borax.  It is no more toxic to humans than table salt.

Apparently, it works to kill ants in two ways.  First of all, the powder is abrasive to the ant's exoskeleton, and when consumed, it is poisonous to their tiny stomachs.  One site said it creates gas (which can't be expelled) and causes a tiny ant explosion.  I don't know who's right, but either is fine with me.  Because borax doesn't cause sudden death, it gives the ants time to carry their find back to the colony where it is fed to their ant friends and, most importantly, their queen.  Supposedly, 3-4 days later, she dies and the colony ceases to exist.  I can't wait.

The recipe is simple:
Poke holes in a plastic container WITH a lid (so other pets won't be tempted to taste).  Mix 1 part borax to three parts sugar.  Add a little water to make it syrupy.  Some recipes recommend the addition of a little peanut butter, but we're out (don't tell my children).  Fill the bowl with the mixture until it reaches within 1/2" of the holes.
Place it in close proximity to the colony and wait.  All reports say that a serious reduction in ants should be noticeable in 3 days, and within two weeks, the colony should be gone.
So long, you industrious little pests.

Tuesday, August 9, 2011

Peach Harvest

When we bought our house, the yard was over-landscaped with ornamental trees and bushes.  That was fine for the previous family, but this one likes to mow in straight lines and thinks that landscaping ought to offer a little more than just a pretty flower come spring.  So, we dug up over 20 plants and found them loving homes amongst grateful neighbors.  The irony is that once the yard was cleared to our liking, we then bought ourselves three self-pollinating fruit trees, but placed them at the back of the lot where they'll offer both buffer and food.  We let the boys each pick a variety, and Cal chose a Belle of Georgia Peach.  We figured that the climate is right, and since our Georgian neighbors seem to grow them abundantly, why not us here in north Alabama?  Since planting, we have lovingly nurtured that tree, and while it did give us 9 ripe peaches, they were 9 of the ugliest fruits I have ever seen.

The story begins with a wee tree and some black leaf spots.   A little research and a trip to the Extension Office turned up a disease called Bacterial Leaf Spot.  It is spread by wind and rain, and once it infects your leaves and fruit, the only treatment is to suffer through the season, prune, and then treat the tree as soon as leaves sprout the following spring.  I read that Neem Oil can help keep the disease from continuing to spread, so we applied it for a few weeks on a 7 day cycle.  The problem only worsened.

Next, I began to notice that as soon as new fruits appeared, they would quickly mummify on the branch.  They'd start off as fuzzy, perfect peaches, then shrivel up and die before maturing.  Another chat with my new friend at the Extension Office revealed the development of Brown Rot.  His advice was to ditch the Neem Oil, pick off and throw away the mummified fruits, and spray with copper as a fungicide.  It seemed to stop the mummification cycle, but we still had a seriously sickly-looking tree.

We sort of limped along through the summer, but as our fruits began to approach maturity, I spotted a new problem emerging:  Peach Scab.  It now appears that we have been attacked by every known peach tree ailment with the exception of powdery mildew.  The fact that we escaped that one may have been the tree's only saving grace.

As it turns out, peaches are a very difficult fruit to grow.  Obviously.  I've talked to many a grower at the farmers markets only to get a chuckle, some reassurance that it is the tree and not me, and little advice.  Start early with the treatments.  They WILL be required.  Be aggressive.  As the tree buds, begin cycles of sulfur and be consistent from bud to petal fall.  Supposedly, under ideal conditions, this will keep the diseases at bay.  But, good luck, they say!

Now, mind you, we have chosen to grow fruit and food in our backyard mostly because it is fun and we love doing it.  But, it is also our small attempt at some self-sustainment, and we want to do it as organically as possible.  So, is sulfur organic?  The answer, it turns out, is yes.  Thank heavens.  Sulfur is a mineral and is the oldest known pesticide in use.  It is non-toxic to mammals and while it can cause eye irritation, it is otherwise not harmful to one's health when used to treat obnoxious, needy peach trees.

Fortunately, Cal isn't yet aware that his tree almost got the axe.  In fact, he checks it religiously, and just this weekend, we decided it was harvest time.  He grabbed his bucket and picked all 9 ugly peaches off the tree.  They may not be pretty, but they were hard won, and we plan to eat every last one.  With out the peeling.  And the bad spots cut out.

Here's to sulfur and next year's disease-free peaches.  Grow, Cal, grow.


Friday, August 5, 2011

Strawberries

In an effort to include our two small boys in this year's garden, we let them choose some favorite seeds and plants last spring.  They chose well, and it should come as no surprise that we ended up with both strawberries and blueberries.  Both have surprisingly produced a small harvest this summer, which is not typical for the first year.  Because we've enjoyed them so much, we've decided to expand our berry growing efforts.  In fact, one of this weekend's projects is to properly define and mulch the berry bed, and move the blueberries from their spot in the garden to along side their blackberry and raspberry friends.  More on that to come.

We knew immediately back in May that we had underestimated our strawberry consumption, so we created a strawberry patch in our herb bed.  There was plenty of room, and I love having a plot that is functional, tasty, and still easy on the eyes.  Who needs begonias, anyway?  Not all of the baby strawberry plants survived the transplant, but I'm happy with what we have so far and will look forward to adding more next year.  They make a remarkably lush and pretty flowerbed.  We chose a Day Neutral variety which means that the fruit will not grow as big, but it is more abundant and can be found throughout the spring, summer, and fall growing season.  These plants do produce some runners and will grow in subsequent years to help us fill our bed.  Other options include June Bearing (one large, singular harvest) or Everbearing (another continual harvest variety that does not produce runners).  The boys think they've found a treasure whenever they find a little red spot among all that green.  While we've yet to have a homegrown strawberry make it inside the house, I love watching my little gardeners enjoy the fruits of their labors.

My father-in-law passed along a tip that I've since happened upon in some reading as well.  It has put the kibosh on strawberry snacking for this summer, but only because it will improve next year's harvest.  For the first year of your plant's development, remove the flower blossoms off all plants as soon as they appear.  This will allow the plant to concentrate its efforts on developing a stronger root system and a more substantial crown (what you call the base of the plant).  In turn, this creates a heartier plant that will produce more strawberries the next growing season.
So, go ahead.  Pinch their little heads off.  Depending on the day, you might find it slightly therapeutic.

Saturday, July 30, 2011

Take-Over

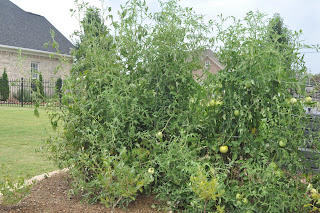
When I first put those tiny tomato plants in the ground, it seemed impossible that they'd get big enough to fill their large wire support cages.  How naive.  I now have a certified tomato jungle in my smallish garden and am considering filing for status under the Rainforest Conservation Act.  Seriously, some days I half expect to find a howler monkey in there.  Since I am currently wishing my garden would produce more - not less - I suffered near cardiac arrest when I realized my husband had whacked (he said trimmed) the side of the tomato row that was threatening lethal takeover of our peppers.  After his trim (to be generous), it wasn't a couple of days before the untouched side began to lean...severely.  The mangle of vines on the opposite side was so heavy and loaded with plump green fruit that gravity was winning the war on those afore mentioned cages.  Fearing a second trimming, I took my jute twine and some bamboo poles and staked the cages upright.

Ah, but the battle continues.  Just this week, I noticed a slight increasing tilt to the left.  My cherokee purple refuses to be contained and needed to be tied to its black krim neighbor to keep from falling out of the garden altogether.  So now, I've tied cages to the ground, cages to each other and vines to cages.  There is no taming of the jungle.  It has a life of its own.

Since they are producing, I don't feel like I've failed the plants just yet, but there is some serious jimmy-rigging going on out there.  I feel confident there must be a better way.  So, I did what any self-respecting 33 year old does when faced with a problem.  I called my parents.  Yes, prune, dad says.  Yes, use twine to train vines.  Eventually, he says, you just have to let go and and let them grow!  

Here's what I've learned so far about growing tomato jungles:
  • Pruning is necessary for the health of your plant.  A tomato plant left to its own devices will not be able to maximize photosynthesis because the density of growth causes leaves to live in permanent shade, thus reducing the amount of sugar they can produce.  Less sugar equals less fruit.
  • Pruning also allows existing leaves and vines to dry more quickly, and keeps fungi and bacteria at bay.
  • Pruning away side shoots (appropriately called suckers) will help the plant stem to remain strong.  Suckers grow in the "v" between the main stem and the leaves.  If left, they'll grow flowers and fruit, which doesn't seem so bad.  However, lower growing suckers weaken the main stem, and those that grow higher on the plant receive less sugar and will themselves be weak. 
  • Appropriately pruning and tying vines helps keep the fruit off the ground and away from insects and rot. 
So, here's what I'm thinking.  Be happy I've got a good crop of tomatoes.  Be happier that next year I'll have more. 

Do you think Lowes sells machetes?

Tuesday, July 26, 2011

Who Knew?

We love avocados around here and eat them often.  You'll have to excuse my humility, but I've gotten pretty good at halving, twisting out the slippery pit, and mashing up a pretty tasty batch of guacamole.  If I do say so myself.  One afternoon during an attempt at some avocado culinary perfection, my husband got the harebrained idea to grow himself an avocado tree.  You'd think that as a former teacher and the mother of two small children that I'd be thrilled with an attempt at science, especially when growing something green is involved.  However, his impromptu approach has led to some redneck gardening on my kitchen counter for the last two months.  About week four I was convinced that nothing was happening and that nothing would happen, but low and behold, his patience prevailed, and we now have an avocado tree.  I'm woman enough to admit when I'm wrong, and now that the tree is ready for removal and transplant, I can do so.  You were right, honey.  I love the tree.  

To debunk the myth that avocados are bad for you because they are high in fat, let me argue this:  the kind of fat contained in an avocado is monounsaturated and has been found to actually lower your cholesterol.  Avocados are also reputed to protect and defend against several types of cancer, prevent strokes, help the body better absorb other nutrients, and they are the best fruit source for vitamin E.  All that dietary rhetoric aside, they taste heavenly.

So now that we're all in favor of sprouting avocado pits on our kitchen counters, let me give you a quick how-to.
  • Wash pit clean.  Pat dry.
  • Stab the pit at the thickest part of its middle with three toothpicks (or other such instrument).
  • Balance pit on the rim of the cup (using the toothpicks) so that it will not fall into the cup.
  • Add enough water to the cup to cover up to 1" of the bottom part of the pit.  
  • Place the pit somewhere it can absorb some sunlight and maintain the water level.  
Apparently, we don't own toothpicks.

Eventually the pit cracks and you'll notice a root system developing.  A little tree will begin to emerge at about 6 weeks or so.  I've read that once it reaches the height of about 6", you pinch off the first set of leaves.  This allows the tree to continue to focus on it's root growing efforts.  Once the second set of leaves sprout, the pit is ready to transplant.  When potting, be sure to dig a hole for the roots, but do not completely bury the pit.  The top of the pit should remain above the soil.  Keep the soil moist, and you've got yourself a tree!

There is a little bad news involved.  Like with any fruit tree, you won't get any fruit for the first 2-3 years of it's life.  Remember, this is a long-term relationship.  Commitment is required.  And, you should buy a nice looking pot, because unless you live in Florida, chances are that your winters drop below 45 degrees and your little tree will need to warm itself by your hearth.   

Cross pollinating it with another avocado tree will help them both to produce more fruit, so I guess I had better keep that spot on my counter reserved for round two.

Monday, July 25, 2011

Vertical Gardening

As a baby backyard farmer, I've made my fair share of rookie mistakes.  In fact, here is a brief list of common phrases coming out of my mouth these days:
  • Ooooooohhhh, that's why.
  • Won't do that again.
  • Huh.
  • Is that a weed or did I plant that?
  • Whoops.
Today's mistake is a whoops.  May you learn from it and go on to grow perfectly trellised melons.


I've been reading about a concept called vertical gardening that is a useful approach for those of us with minimal space, wet weather, bug problems, or who are tired of bending over while tending to plants.  Here's how it works.  Instead of allowing your beans, melons, cucumbers, eggplants, peas, etc. to spread their little vines and tendrils all over your well planned garden, send them skyward.  Depending on the type of plant and its growth pattern, you can use wire cages, bamboo poles, or trellises to encourage this upward growth.  It is a solution with some serious benefits for me since I adore a vine ripened melon, but can't afford the square footage needed to grow them.  Once I discovered vertical gardening (again, those of us in our infancy need such things explained), I decided to give it a go with some cantaloupes and petite watermelons.  


Here is the problem I encountered.  I planted the plants.  They sprouted.  They are healthy.  So far so good.  One morning I woke up to find they'd grown arms - many of them - overnight.  I figured it was time to get those little bamboo tepees in place so that the vines could begin their crawl toward the light.  However, it turns out that in the debate "Which comes first: the pole or the plant?" it is most decidedly the poles.  The plant should be planted near the base of each leg (rather than in the middle) of the tepee so that you aren't forced to stretch the runners and tie them to the poles.  Let the tendrils do the work and give the plant an anchor (the pole base) to support the hard work ahead of it.
See mine in the middle?  Experience has been a good teacher, so next year, it is to the corners with those vines!


Once your plants begin to produce their heavy fruit, I've read that items such as socks, panty hose, cheesecloth or some type of netting can be wrapped under the fruit and then tied to the pole to alleviate a little of the weight and give the vine some extra support.  Sounds like a good excuse for control top to me.


If you'd like to read a complete article on the vertical gardening concept, here is a good one.


Have you ever tried to grow anything vertically?  Were you successful?

Tuesday, July 12, 2011

Hard Time

This is startlingly ridiculous.  


A woman in Michigan is facing trial and a potential 93 day jail sentence for the crime of planting vegetables in her front yard.  Due to repairs on a sewage pipe beneath her property in May of this year, Julie Bass was left with the hefty task of restoring the damage to her lawn.  Rather than install sod, Julie decided to use the piles of dirt as an opportunity to create raised beds for the purpose of growing food.  You know, criminal things like squash and peppers.  The city of Oak Park has now charged Julie with violation of a city ordinance that claims residents must cover their grounds with "suitable live plant material."  Question is, who defines suitable?  Julie's attorney claims that her gardens fall under an exemption to the ordinance that states a provision for "flower gardens, plots of shrubbery, vegetable gardens and small grain plots."


Let's keep in mind, too, that Julie's property resides in a neighborhood where she is bound by no HOA or covenant.  


Of all people, I certainly understand the desire to rest my eyes on things neat, orderly, and most definitely beautiful.  If you're going to grow food in your front yard, keep it presentable.  I might not have chosen to construct raised beds in the same way Julie did, but she keeps them nicely AND she is growing her own food.  I can't find fault (legally or otherwise) in her attempts.  You know this movement is near and dear to my heart.  More power to you, Julie.


What are your thoughts?


For the full story, click here.
Related Posts Plugin for WordPress, Blogger...